When performing the Cycle Invoicing process, you should close other software applications prior to beginning and not open any new applications until the process is finished.
 Important Notes:
- No Users should be completing any customer cancellations or be making any changes to recurring lines while the cycle invoicing is in progress.
- Any un-posted cycle batches must be posted or deleted prior to beginning a new batch.
To begin the Cycle Invoicing process, follow the steps below.
Generating the Cycle
1. Navigate to the Accounts Receivable Menu and select the Cycle Invoicing menu option.
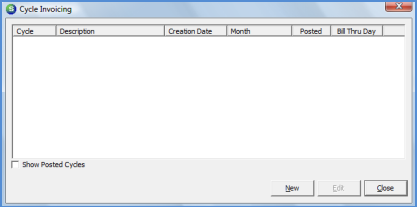
2. The Cycle Invoicing [Batch List] will be displayed. To start a new cycle batch, click the New button located at the bottom of the Cycle Invoicing form.
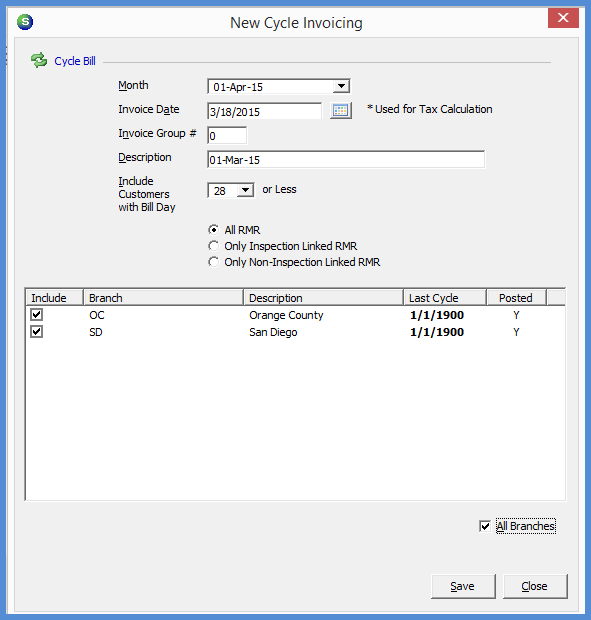
3. Enter Selection Information - The New Cycle Invoicing form will be displayed. The User will need to make selections or enter information into the following fields of this form.
Month: This is a drop-down list; select which month/year is going to be cycled. If you want to cycle a month that has previously been cycled, scroll down the list until the month/year to be cycled is located.
Invoice Date: Enter or select a date using the calendar icon; this will be the date that is used to determine sales tax and will become the invoice posting date.
Invoice Group: The default is Invoice Group "0". If you company has created and is using other invoice groups (saved on each recurring line), each group must be invoiced in a separate cycle batch.
Description: This defaults to the Month for which being cycled. You can change this description or leave the default description. If you are invoicing certain Branches separately, you may want to change the Description to indicate the Branch(es) contained in the batch.
Include Customers with Bill Day: If your company recurring lines setup is not billing from the beginning of each month, you can select a particular bill day from the drop-down list. Only recurring lines with a bill day equal to or less than the value selected will be considered for the cycle. If the recurring lines setup is always to bill on the first of the month, then leave this value set to 28.
Branch Selections: If your company has more than one branch, select one or multiple branches by checking the box to the left of each branch to be included in the cycle batch.
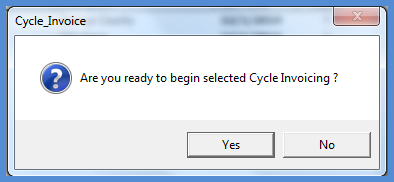
Once all selections have been made, click the Save button located at the bottom of the New Cycle Invoicing form to begin the process. A message appears asking if you are ready to begin the Cycle Invoicing process; click the Yes button to execute the cycle invoicing program.
 Do not use other programs once the Cycle Invoicing Process has been started.
Reviewing the Cycle Batch Results
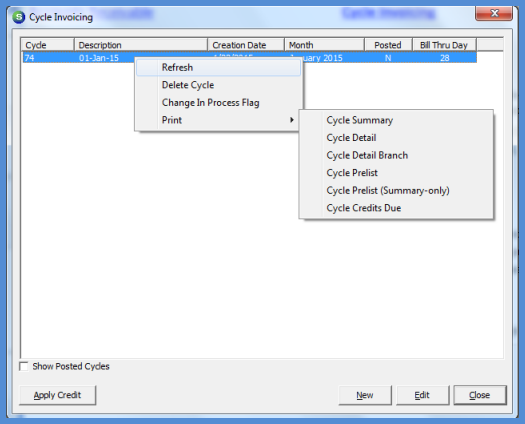
4. Review the Results - Once the Cycle Invoicing Generation Process has completed, the Cycle Invoicing [Batch List] will be displayed. To print (or view) the results of the Cycle, highlight the Cycle, right-click then select Print; select one of the report options.
Once the selected report is displayed in preview mode, you can export the results to an Excel spreadsheet, a PDF file, an RTF file (MS Word type), HTML page, or a plain text document, or you can print the report to a printer. To export the report, click on the desired export format button from the upper toolbar of the Report Preview.
After the Cycle Report has been reviewed, proceed to the Posting process. If errors were found and recurring lines need to be corrected, delete the Cycle; make the necessary corrections to the recurring lines then begin the Cycle Generation process again with steps 1 through 4. If report results are satisfactory, proceed to step number 5. If corrections need to be made to recurring lines, please read the next paragraph for instructions on how to delete a cycle.
Delete a Cycle Batch
To delete a cycle in need of corrections, navigate to Accounts Receivable/Cycle Invoicing, highlight the Cycle then right-click, and select Delete Cycle. A message opens confirming if you want to delete the selected cycle; press the Yes button to delete the cycle.
Posting the Cycle Batch
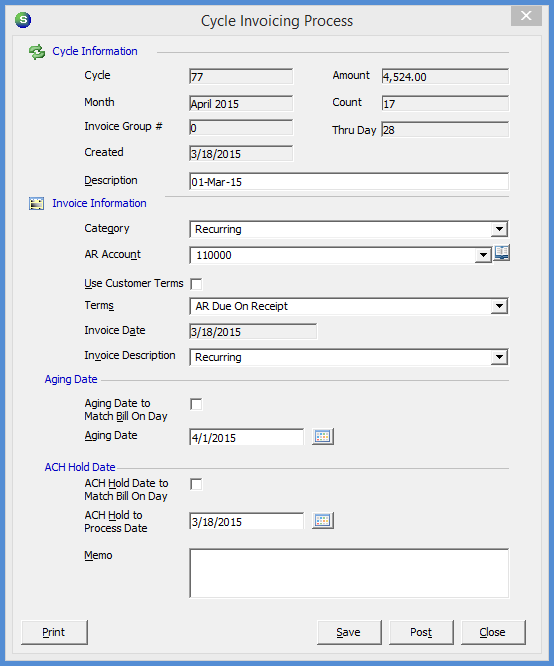
5. Post the Cycle / Create the Invoices - Double-click on the Cycle from the Cycle Invoicing [Batch List]. The Cycle Invoicing Process [Posting] form opens. You need to make selections or enter information into all required fields on this form to be able to post the cycle batch. Once all fields have been populated, click the Post button located at the lower right side of the form to begin the posting process.
Description: This is a description of the cycle batch, which is for reference purposes only and will default to the description selected when the batch was generated, however the User may change the default description.
Category: Make a selection from the drop-down list; typically Cycle Billing, Monitoring, or Recurring is the selection. The choices displayed are from the SedonaSetup Category setup table.
A/R Account: This is the G/L posting account for the debit side of the transaction and will default to the Accounts Receivable G/L account number defined in SedonaSetup G/L Account Defaults for AR. Do not select a different account without first consulting with a SedonaOffice Support representative.
Use Customer Terms: If this checkbox is selected, the Invoices created will use the default Terms Code setup on each Customer's account. To use the same Terms for all Invoices created, leave this checkbox cleared and make a selection in the next field, Terms.
Terms: Make a selection from the drop-down list. The terms code selected will be applied to all invoices in the cycle and determine when the invoices are due. The choices displayed are from the SedonaSetup Terms setup table.
Invoice Date: The Invoice Date field cannot be modified. This field displays the date that was selected when generating the Cycle; since that date was used for sales tax calculations, you cannot change the Invoice Date.
Invoice Description: Make a selection from the drop-down list. The choices displayed are from the SedonaSetup / Invoice Descriptions setup table. This description is a general description of the type of services being presented on the invoice; such as Recurring Services, and is printed in addition to the individual invoice line descriptions. The invoice description prints near the bottom of the invoice on the Standard Invoice format, is displayed on the Customer Explorer for open invoices, and also appears on customer statements.
Aging Date To Match Bill On Day: A selection is only needed if your recurring lines are not billing for services from the beginning of the month; where you have selected Day of Service Start in SedonaSetup Setup Processing for AR [Invoicing-Cycle Beginning Day].
Aging Date: Type in or select a date by pressing the calendar icon to the right of this field. This is the date on which the invoices will begin to age.
ACH Hold Date To Match Bill On Day: This is optional if you are using the Day of Service Start option as mentioned in Aging Date To Match Bill On Day. If it is desired to hold the automatic payment to be processed until the Bill On Day for the recurring line, then select this checkbox, otherwise, the hold date setup on the customer’s EFT information will be used as the hold date.
ACH Hold To Process Date: Type in or select a date by pressing the calendar icon to the right of this field. This is the date any automatic payments will be eligible for processing. This date cannot be prior to the date you are posting the cycle.
Memo: Information entered into this field will be saved to the Memo field of all invoices in the cycle and print on invoices if the printing format selected during invoice printing is designed to print the invoice memo field. If your company is using BFIS to print your invoices, this memo will be included in the print file. This field has a 255 character limit.
Once the form is completely filled in, click on the Post button.
 During the Invoice Posting process, Do Not use any other applications until the Invoice creation process is finished.
Applying Credits
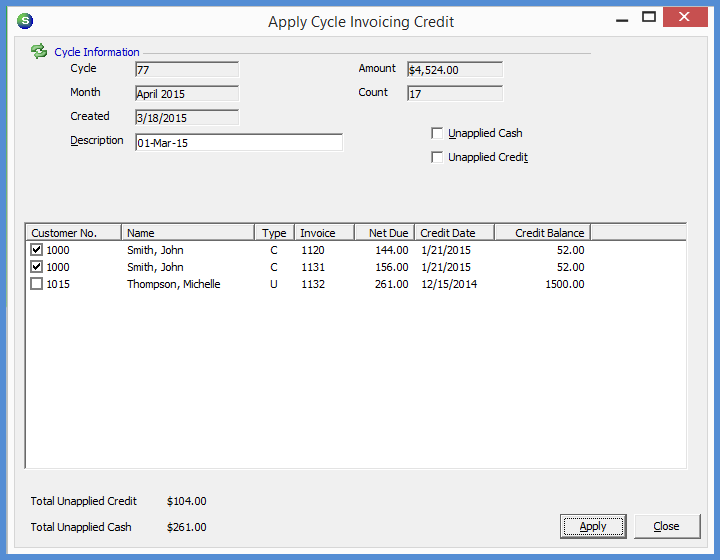
Once the Invoice Posting process has completed, the Apply Cycle Invoicing Credits form opens. If any of the customers in the cycle batch have unapplied cash or unapplied credit memos on their account, those unapplied items will be listed in the grid area of the form.
You can choose to do the following:
- Select the Unapplied Cash checkbox (in the header area); this will apply all Unapplied Cash available to the Invoices.
- Select the Unapplied Credit checkbox (in the header area); this will apply all Unapplied Credit Memos available to the Invoices.
- Select the checkbox to the left of the selected Customers for which you want to use the Unapplied item.
- Do not apply any Unapplied amounts by clicking the Close button located at the lower right of the form.
6. After clicking on either the Apply button (you have selected to apply amounts) or the Close button, the Invoice Posting process is now completed. The next step is to Print the Cycle Invoices.
Printing Cycle Invoices
Printing the cycle invoices is the last step in the cycle invoicing process. Follow step 7 through 8 to print the cycle invoices. If your company is exporting invoices to Sebis (add-on option for outsource printing) for printing, click on this link for instructions: Export Invoices to Sebis.
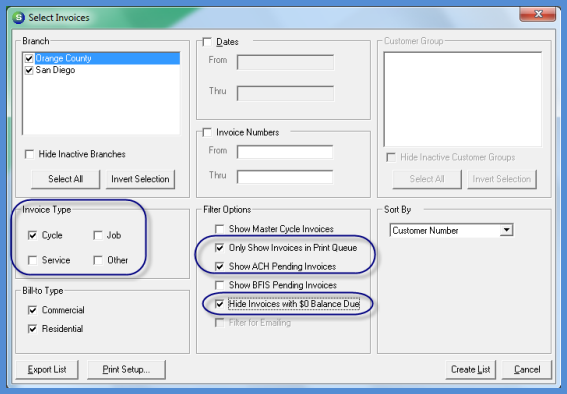
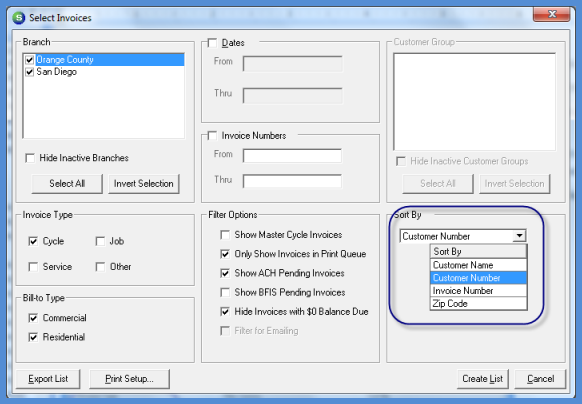
7. Select Printing Options - To print the cycle invoices, navigate to the Accounts Receivable / Print Invoices menu option. The Select Invoices form opens so you can select which options pertain to the printing of the cycle invoices.
Select Invoice Type
If it is desired to print only Cycle invoices, in the Invoice Type area clear the checkboxes to the left of Service, Job, and Other and leave the Cycle box selected.
Filter Options
Options are available for selection when printing your cycle invoices which are listed below. Select the checkbox to the left of each option that you desire.
Only Show Invoices In Print Queue: By default all invoices created will be flagged to appear in the invoice print queue. Do not clear this checkbox.
Show ACH Pending Invoices: Select this checkbox to include customers that are set up for Automatic Payment Processing for their cycle invoices that also want a printed copy of their invoice.
Hide Invoices with $0 Balance Due: If unapplied amounts were applied to the cycle invoices that resulted in paying off the invoice, you have the option of printing or not printing these invoices. If you do not want to print these invoices, select this checkbox.
Note: If you have selected not to print zero balance invoices, once you have finished printing invoices, you will need to return to the Printing Invoices to mark the zero balance invoices as printed, which removes the invoices from the print queue.
Sort By
From the drop-down list, select the order in which the invoices will be printed.
Once all options have been selected, click the Create List button located at the lower right of the Select Invoices form.
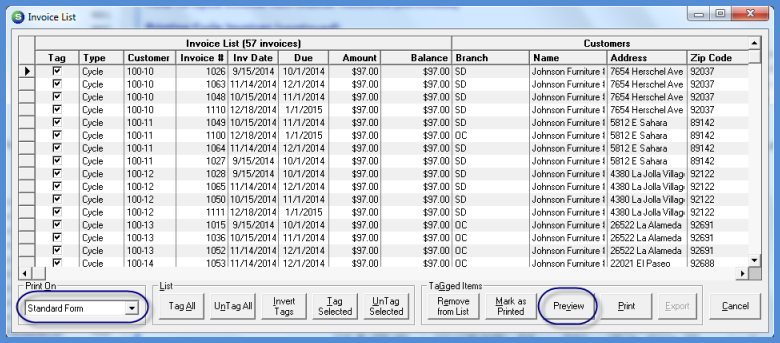
8. Print Preview / Send Invoices to a Printer - The Invoice List opens with a list of invoices that met the criteria for the options selected. Select the desired printing format from the drop-down list at the lower left. You can preview the invoices before sending to the printer by clicking the Preview button located at the lower right of the form. If it is desired to send the invoices directly to the printer without previewing first, click the Print button located at the lower right of the form. It is highly recommended you Preview the Invoices prior to sending to the printer; while spot-checking invoices, you may find that you forgot to choose an option needed to printing in your desired format.
Depending upon the Invoice Format selected, additional print options forms may be displayed for making additional selections.