A customer payment batch consists of two elements: 1) the batch header which specifies the date, description and the tape (expected) total and 2) the individual payments for each customer. First create the Batch Header before entering the customer payments.
When creating a Payment Batch Header, you can enter a Tape Total amount; it is recommended that you first total all payments on a calculator prior to beginning the batch. As customer payments are entered, the application keeps a running total of all the payments. If a data entry error is made when entering payments, you will have a total to compare to if an actual tape total is entered when creating the batch.
If entering payments for Credit Cards or ACH transactions and your company is not using Forte for automated payment processing, separate payment batches should be created for credit cards, ACH, and checks. This will make the bank reconciliation process much easier at a later time.
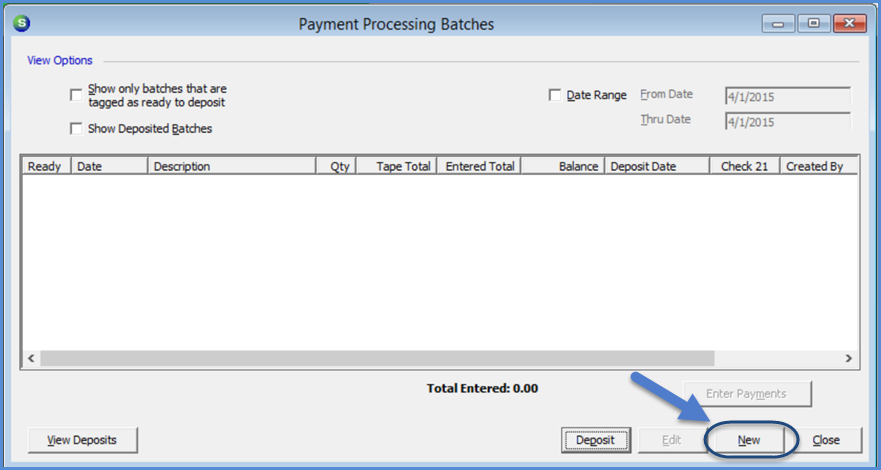
1. Navigate to the Main Application Menu and select the Accounts Receivable / Payment Processing menu option.
2. The Payment Processing Batches form will be displayed. Click the New button located at the lower right of the form to begin a new payment batch.
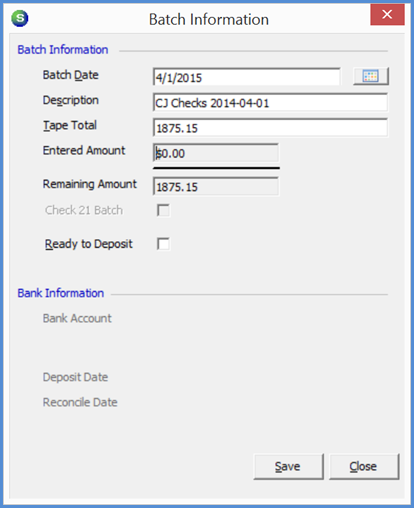
3. The Batch Information form will be displayed. The Batch Date defaults to today's date, however, you can change this if needed. Enter a Description, and the Tape Total (total amount of payments to be entered). Click the Save button when finished.
Note:
- The tape total is not required; however, entering this amount can help when entering payments to catch data entry errors.
- If more than one person creates and enters payments, you may want to include the individuals initials as a part of the description.
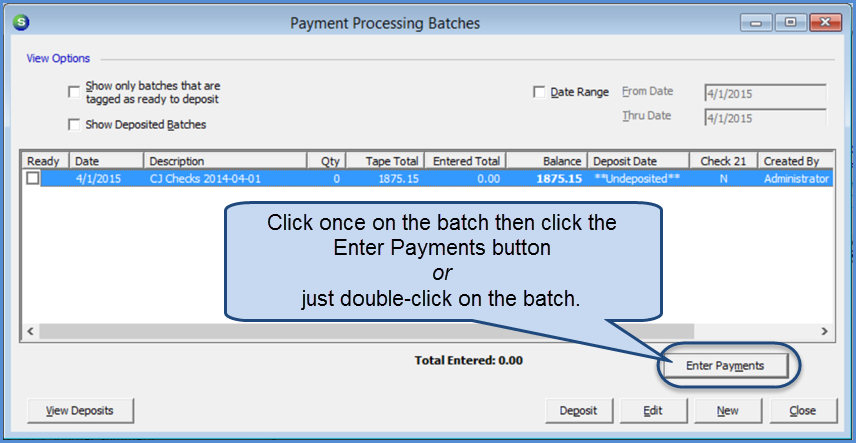
Once the batch header has been saved, the Payment Processing Batches list opens again; the new batch appears in the batch list.
4. To begin entering customer payments, double-click on the batch or click once on the batch then click the Enter Payments button located at the lower right of the Payment Processing Batches form.
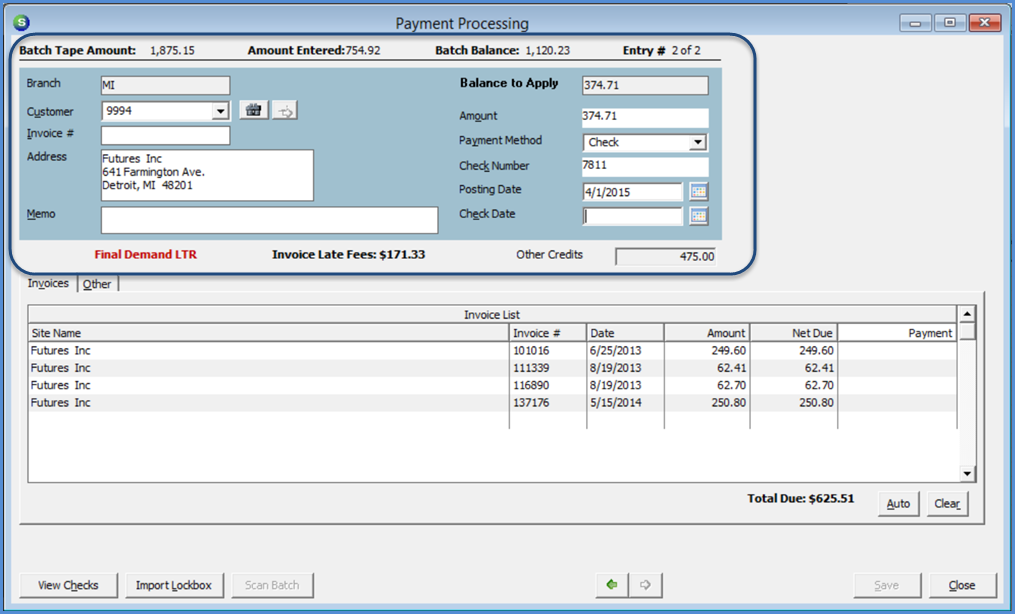
Fill in the Payment Processing form for each customer payment included in the batch. Below is an explanation of the data entry fields in the header section of this form.
Customer – Type in the customer number or the customer name in this field or click the binoculars icon to the right of this field to lookup the customer number. The customer address will automatically fill in once the customer is entered into this field.
Invoice # – If the customer has written their invoice number on the check, typing that number into this field will automatically fill in the customer name and address information.
Memo – This is an optional field where the User may enter up to 50 characters of text. Information entered into this field may later be viewed from the payment history within the Customer Explorer record.
If a check is being split between multiple customers, you can enter the total amount of the check and reference the other customer numbers where the remainder of the check will be posted.
Amount – Enter the amount of the check.
Payment Method – This field will automatically default to Check. A different payment method can be selected from the drop-down list.
Check Number – Enter the customer’s check number.
Posting Date – This field defaults to today’s date, but may be overridden.
Check Date – This is an optional field for entering the check date; the date written on the customer's check.
Other Information
Below the Memo field three additional pieces of information can be displayed:
- If the customer is currently in one of the Collection Queues, their Collection Status is display with a bold red font.
- If any late fees exist on the customer account, that amount is displayed in a bold black font.
- Other Credits field; if the customer has any unapplied cash, unapplied advance deposits or unapplied credit memos on the account, this field displays a total of all these amounts.
Applying Payments to Invoices
Payments can be applied to invoices, an advance deposit for a job, late fees accrued on the customer account, unapplied cash, or applied to a miscellaneous GL account. The payment can be distributed to invoices or one or many of the other payment application options.
5. Once a customer number has been selected, the list of all invoices with an open balance is displayed. In the Payment column of the Invoice List the User will type in the amount to apply to the invoice or click the Auto button located at the lower right of the form.
Auto Button
Clicking the Auto button will try to match the total payment amount to an exact invoice balance. If the application finds a match, the payment is applied to that invoice. If there is more than one invoice of the same amount as the payment amount, the application will apply the payment to the lowest invoice number. If there are no invoices with an exact match to the payment amount the payment will be applied to the lowest invoice numbers first until all of the payment is distributed.
When using the Auto button, if any amount is still left to be applied after all invoices have been marked for payment, navigate to the Other tab to save the remainder of the payment to one or more of the available options.
Clear Button
If the payment was applied to the incorrect invoices and you want to start all over applying the payment, click the Clear button to remove all amounts entered into the Payment column.
Save Button
Once the payment has been completely applied, click the Save button to enter the next customer payment.
As payments are entered, the application keeps a running total of all payments entered; this is displayed at the top of the Payment Processing form.
Applying Payments – Other Options
Once a customer number has been selected, a list of all invoices with an open balance is displayed. If the customer has no open invoices the payment will be applied on the Other tab of the Payment Processing form. You may apply part of the customer's payment to combination of invoices and "Other" options.
When applying a payment using the Other form, there are four options to distribute the payment amount. The payment may be distributed to one or a combination of the options available. Select the checkbox to the left of the option that will be used. By default, the total amount of the customer payment (or the balance of the payment if some amount was first applied to invoices) will fill into the Amount field for the option selected. If the payment is being split between multiple options, manually change the Amount field in each of the options selected. The amount(s) entered on the Other form must total the payment amount entered in the header of the Payment Processing form to be able to click the Save button.
Note: If you do not use the Miscellaneous (G/L Account) option, select the desired GL Account and Category Code according to your company's policies and procedures.
Payment Application Options
| Option | Description | Typical Uses |
|---|---|---|
| Unapplied Cash | A payment that will remain on the customer's account as an unapplied item. Manually applied at a later time. | Typiically used when a customer overpays an invoice or sends in a payment before an invoice is generated. |
| Advance Deposit | A payment received for an installation to be performed. | There must be a job available on the customer's account to be able to select this option. |
| Late Fee | If late fees have been assessed on a customer's account, the payment may be applied to all or a portion of the total late fee. | Applies funds to a pre-defined late fee GL account number. This is account is defined in SedonaSetup > GL > Account Defaults for AR. |
| Miscellaneous GL Account | Select the GL account to apply the payment. | Payment was received for a canceled account where the invoices were previously written off. -OR- Payment was received from a non-customer such as a vendor rebate, insurance refund, etc. |
Once all payments have been entered and the total of the payments entered matches or is greater than the Tape Total entered for the payment batch, the User will be presented with the message displayed below. If the User has entered all the payments and this message is not displayed, this indicates that either the Tape Total was incorrect or one or more of the payments entered was incorrectly. If this message is displayed prior to all payments being entered, again there was a data entry error with either the Tape Total or on one or more of the payments entered. If the payment batch is in balance, click the Yes button on the Payment Processing message. If the payment batch is not in balance, refer to the topic Payment Batch-Correcting Errors for instructions on locating and making corrections.

Deposit a Payment Batch
Once all payments have been entered, deposit the batch into a bank account.
Located on the Make Deposit form is a checkbox labeled Single Deposit in GL. If this checkbox is selected, and your company is operating under multiple branches and customer payments contained within the payment batch being deposited are in multiple branches, the program will post one debit entry to the GL for the bank account where the deposit is being posted. If this checkbox is not selected, a debit entry to the G/L will be made to the bank account for each branch found in the payment batch.
Follow the steps to deposit the payment batch into a bank account.
6. From the Payment Processing Batches List, click the Deposit button.
7. The Make Deposit form opens. Complete the required fields on this form:
Deposit Date - Today’s date will default into this field. To make the bank reconciliation process easier, this should be the date the funds were actually deposited into the bank account.
Single Deposit in GL – Select this option if it is desired for one debit entry to post to the GL for the bank account.
Branch – If the previous option, Single Deposit in GL was selected, select from the drop-down list which branch to use for posting the cash batch. If the previous option was not selected this field is grayed-out.
Bank Account – From the drop-down list, select which bank account to use to deposit the payment batch.
Description – Enter up to 50 characters of text to describe the payment batch.
Print Deposit Ticket – By default this option is selected. If you do not want to print the deposit ticket report after clicking the Save button, clear this option.
Once the above selections have been made, select the checkbox to the left of all the payment batches to be included in this deposit. Click the Save button located at the lower right of the form to post the deposit to the GL and print the deposit ticket.