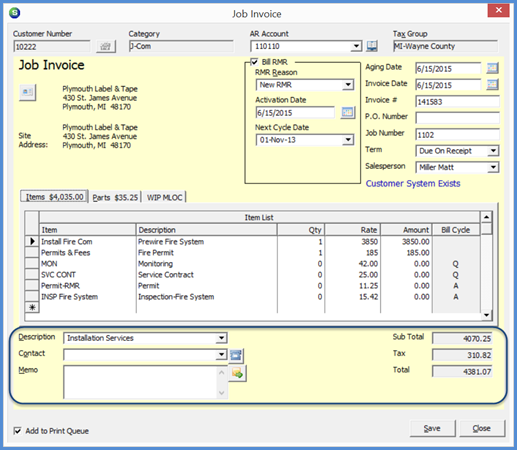
The Job Invoice is automatically filled in with all charges setup on the job that have not yet been invoiced and other fields that default information from the customer and the customer Bill To records.
Items, recurring items, and parts being invoiced is strictly controlled by those items setup on the Job record. You cannot manually add any additional items to a Job invoice. If additional items need to be invoiced, they must first be setup on the Job record.
This form consists of three possible tabs in the center area of the form and many data entry fields; these will be defined below.
Job Invoice - Header Section
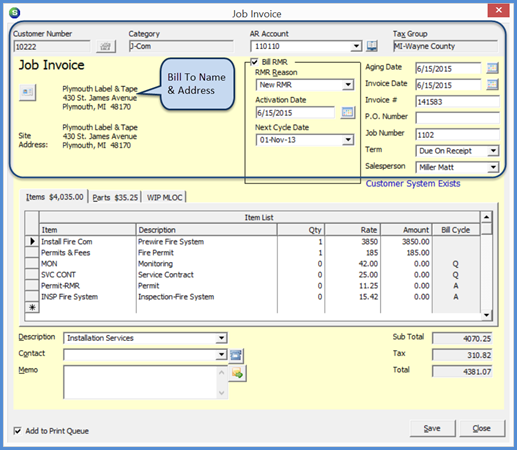
- Bill To Name & Address: The customer bill to address which is flagged for Job invoices, will default into the invoice form; if the customer has only one Bill To address, this address will automatically fill into this area. If the customer has an alternate Bill To address setup that you need to use for this invoice, click the button to the left of this field to select the correct Bill To address.
- Bill RMR: This box contains information which controls what period of time a customer will be billed for recurring services on this invoice.
- The RMR Reason will default from the SedonaSetup defaults; you can select a different reason code from the drop-down list. This is the reason why the new recurring is being created.
- The Activation Date and Next Cycle Date fields control the period of time the customer will be invoiced for the recurring services listed in the body of the invoice. In the example provided below, the customer is setup for quarterly invoicing and will be invoiced for 2.2 months of recurring for the service period of 8/26/2022 (Activation Date) through 10/31/2022 (one day prior to the Next Cycle Date selected. Once this invoice is saved, the Recurring Lines will be setup on the customer record. When the November 2022 cycle is generated, this customer will be invoiced for a full quarter of services.
If the Recurring Charges are to be invoiced on a separate Job Invoice, clear the Bill RMR checkbox; all Recurring Charges lines will be removed from the invoice body and may be invoiced at a later time.
If there are no recurring charges setup for the Job, ignore this section.
Invoice Header Data Entry Fields
- Aging Date: The Aging Date is automatically be filled in based on the default Term Code on the Invoice. You have the option of overriding this date. This is the date on which the invoice will begin to age. Consult with your accounting manager before changing this default date.
- Invoice Date: The Invoice Date will default to today's date. You can override this date if necessary; only dates that are in an open accounting period are permitted.
- Invoice Number: The Invoice Number is automatically assigned and cannot be changed.
- PO#: If a PO# was entered on the Job Work Order form, this value will default into this field. You cannot manually type in a PO# into this field. If you need to have a PO# print on the customer invoice, close the invoice form; enter the PO# on the Job Work Order form; and return to the Job Invoicing.
- Job #: The Job Number will automatically fill in. The Job Number may not be modified.
- Term - The Term Code will default to the term code on the customer record. You may select a different term code from the drop-down list if special terms are being used for this Job Invoice.
- Salesperson: The Salesperson will automatically fill in with the Salesperson assigned to the Job on the Job Work Order form. This field is typically not modified.
Invoice - Body Section - Items
The Invoice Body is divided into three possible forms: Items, Parts and WIP MLOC (Work in Process -Materials, Labor, Overhead, Commissions). The WIP form will only be displayed if your company is using Work in Process accounts for job expenses.
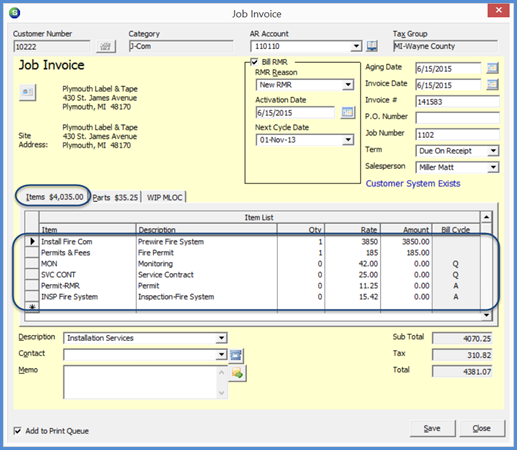
Items Tab
The Items form is automatically filled in with all Install Charges and Recurring Charges setup on the Job that have not yet been invoiced. The quantity column for Recurring Charges is controlled by the dates entered in the Bill RMR section of the Invoice Header.
- Item: This is the Invoice Item Code setup on the Job Install Charges or the Job Recurring Charges.
- Description: The default description associated with the Invoice Item in SedonaSetup will default. This field cannot be modified. If you need to change the description of the charge that will print on the customer invoice, this must be done on the Job Install or Recurring Charge line(s) prior to generating the invoice.
- Qty: For Install Charge lines, the quantity will automatically fill in with the quantity specified on the Install Charges lines with in Job. If performing progress invoicing, the quantity may be changed. For example if you wish to invoice 50% of the Install Charge, enter .50. The next time the Job is invoiced, only the remaining quantity will default into the Job Invoice. For Recurring Charge Lines, the quantity is controlled by the dates entered in the Bill RMR section of the Job Invoice Header.
- Rate: The rate will automatically fill in with the rate specified on the Install and Recurring Charge lines with in Job. If performing progress invoicing, the rate can be changed to any amount (instead of changing the quantity in the previous field). The next time the Job is invoiced, only the remaining amount will default into the Job Invoice.
- Amount: The Amount field is automatically calculated; Qty x Rate. This field cannot be modified.
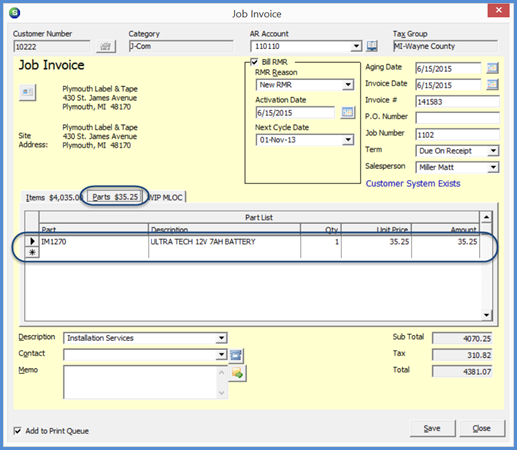
Invoice - Body Section - Parts
The Parts form is automatically filled in with all Part Charges setup on the Job that have not yet been invoiced. Only Parts on the Materials List containing a Unit Price will fill into this form. If a partial invoice is being created, You may change the part quantity or if any of the parts are not to be invoiced at this time, highlight the part line then click the delete key on your keyboard to remove the part from the invoice. The next time the Job is invoiced, any remaining parts to be invoiced will automatically fill into this form. You also has the option of overriding the part Description field if necessary.
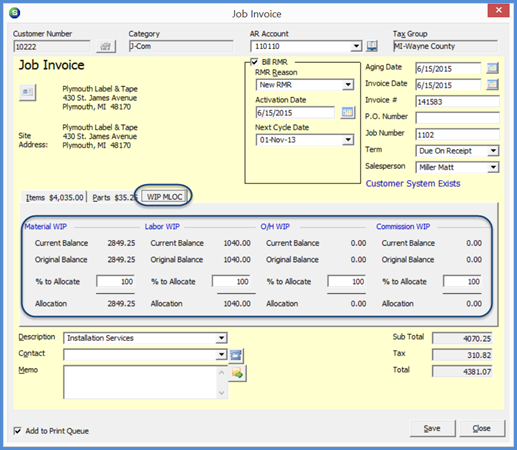
WIP MLOC (Materials, Labor, Overhead, Commissions)Tab
The WIP MLOC form is only displayed if your company is using work in process accounts for Job expenses. This form is divided into four columns which display the Current WIP balance, the Original WIP balance, the % to Allocate and the Allocation Amount for Materials, Labor, Overhead and Commissions.
The % to Allocate is based on the percentage of the job being invoiced. If the quantity field of the Install Charges is not modified, then the Allocation percentage will default to 100%. If the Install Charge line(s) has been reduced to 50%, the WIP Allocation % will change to 50% and recalculate the amount of WIP that will be relieved with this Job Invoice.
You have the ability to manually change the allocation percentage to any amount less than 100%; any amounts remaining in the WIP accounts will automatically fill in the next time the Job is invoiced.
Invoice - Footer Section
The Invoice Footer contains data entry fields and displays the total amounts of the invoice.
- Invoice Description: This field will automatically fill in with the default Job Invoice Description in SedonaSetup/Data Entry Defaults. This is the general description for all charges contained on the invoice. You can select a different invoice description from the drop-down list if desired.
- Contact: If you wish to print an attention to name to print on the invoice, select a name from the drop-down list. If no names appear in the drop-down list, you may manually type in a name or click the button to the right of the field to create and save a new contact.
- Memo: Type information into this field that will print on the customer invoice.
- Close Job: If this is the final invoice for the Job and you wish to close the Job after saving the invoice, select this option. If this option is selected, after clicking the Save button on the invoice form, the Job Closing forms open.
- Add to Print Queue: This option is automatically selected. If you want to print the invoice now and do not want to send the invoice to the Printing Queue, un-check this option.
- Use Adv Dep - If there is an Advance Deposit for the Job on the customer's account, this option will automatically be selected. Once the invoice is saved, the Advance Deposit will be applied to the Job invoice.
Sub Total, Tax, Total - These three fields are display only and are calculated by the application based on the items being invoiced and the tax rules associated with the Tax Group selected in the invoice header.