Follow the instructions below to create a new vendor record.
- Navigate to the Main Application Menu and select Accounts Payable/Vendors.
- The Vendors List opens. At the lower right of the form click the New button.
- The New Vendor form opens. This form is divided into three tabs available for data entry; Vendor, Custom Fields, and Notes. Each data entry form and the fields on each form are described below.
- Once all information has been entered, click the Save button located at the lower right of the New Vendor form.
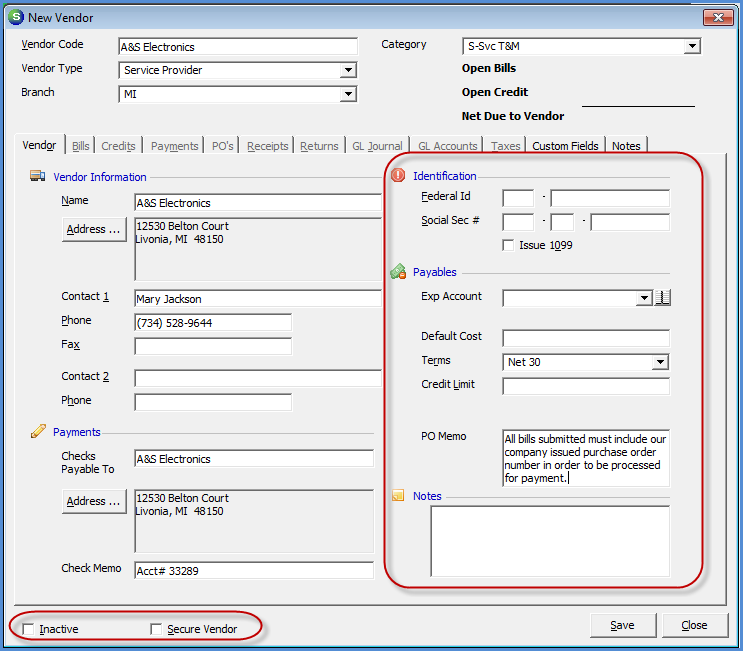
Vendor Form
The Vendor form is divided into several sections, each of which is described below: Vendor Header, Vendor Information, Payments, Identification, Payables, and Notes.
Vendor Header
The fields within the Vendor Header are used to identify the Vendor and select defaults that will be used for accounts payable data entry.
- Vendor Code: This is the code under which the vendor record is saved and used when searching for vendor records. It is not recommend numeric values be used since most of the accounts payable reports group on the Vendor Code. This field has a 25 character limit. If the vendor has a longer name than 25 characters, this can be abbreviated and the full vendor name can be entered in the Name field.
- Vendor Type: Select the appropriate code from the drop-down list.
- Branch: Select the default branch from the drop-down list. This can be overridden when creating bills and purchase orders.
- Category: Select the default category from the drop-down list. This can be overridden when creating bills and purchase orders.
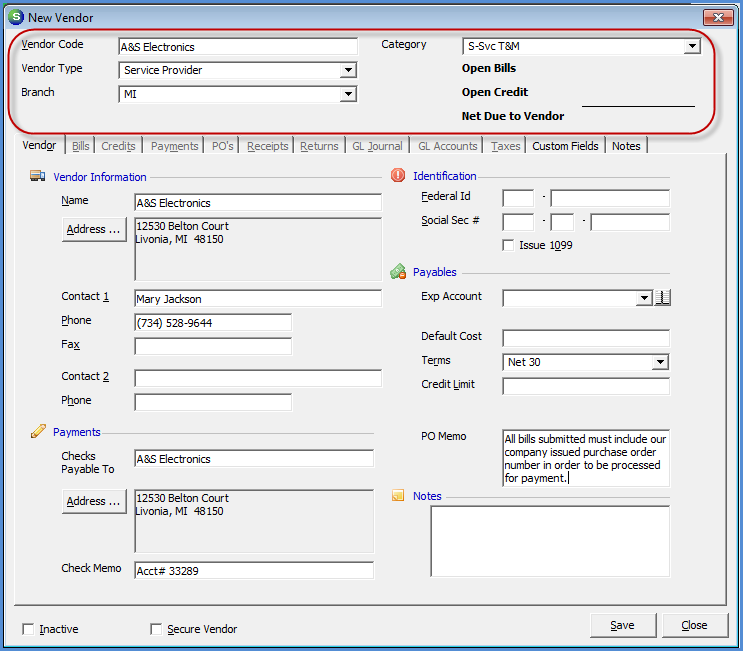
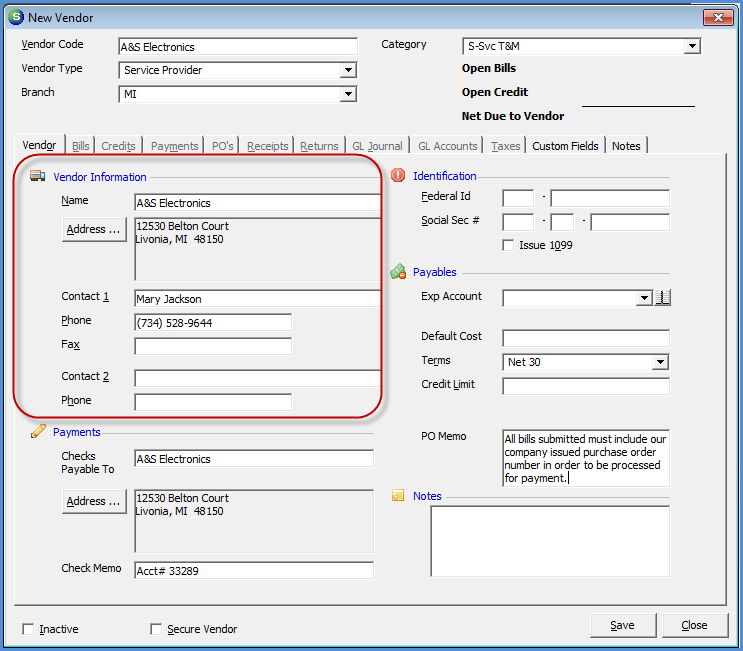
Vendor Information
The fields within the Vendor Information area are used to identify basic information about the vendor. There are two contact names and phone numbers available for each vendor. It is recommended one contact be delegated to be used for an Accounts Payable contact and the other be used as a Purchasing contact.
- Name: Enter the vendor name as you want it to be displayed and printed on purchase orders.
- Address: Click the Address button to enter the vendor address to be displayed and printed on purchase orders. Enter the Address Line 1; tab to the zip code field; type in the zip code; and press the tab key. If a valid zip code was entered, the city and state will automatically fill into the form. The County and Township fields are optional and must be setup in the SedonaSetup Geographical tables to be available for selection.
- Contact 1: Name of the primary contact person for this vendor.
- Phone: Phone number for the primary contact name.
- Fax: The vendor fax number.
- Contact 2: Name of the secondary contact person for this vendor.
- Phone: Phone number for the secondary contact name.
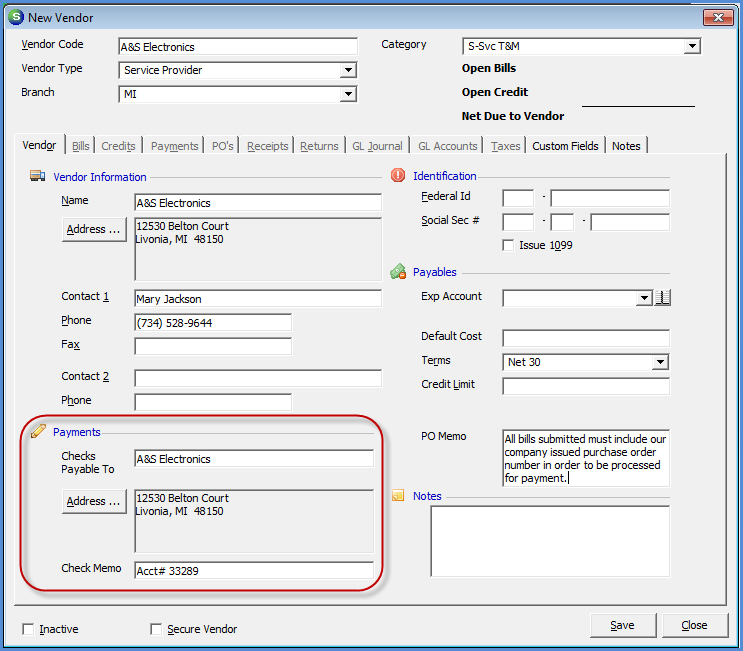
Payments
The Payments section is used to enter the name and address information that will print on Accounts Payable Checks. The Name and Address information entered into the Vendor Information area will default into the Payments section; the users can override these fields if the Accounts Payables checks are to be sent to a different name or address.
- Checks Payable To: Enter the vendor name as you want to be displayed and printed on purchase orders.
- Address: Click the Address button to enter the vendor address that will be displayed and printed on Accounts Payable checks. Enter the Address Line 1; tab to the zip code field; type in the zip code; and press the tab key. If a valid zip code was entered, the city and state will automatically fill into the form. The County and Township fields are optional and must be setup in the SedonaSetup Geographical tables to be available for selection.
- Check Memo: This is a free form text field most commonly used for your company account number with the vendor. The information entered in this field will print on all Accounts Payable checks for this vendor.
Identification
This section is optional, but recommended for reporting purposes.
- Federal ID: This field is used to enter the vendor’s Federal Tax ID number if applicable.
- Social Sec #: Enter the Social Security Number for the vendor if applicable.
- Issue 1099: If your company needs to issue a 1099 for the vendor, select this option.
Payables
This section is optional, but recommended for reporting purposes.
- EXP Account: Enter the default General Ledger Account number to use for posting Accounts Payable bills or credits. This can be overridden when creating bills.
- Default Cost: Optional; if you purchase one expense item exclusively, enter the default cost of that item.
- Terms: Required; enter the default Terms to be used when bills are entered.
- Credit Limit: This is an informational only field to enter your credit limit with the vendor.
- PO Memo: Information entered into this field will auto-fill into the memo field for all purchase orders created for the Vendor. Example: All bills submitted must reference a Purchase Order Number.
- Notes: This is a free-form text field where you can enter up to 255 characters of information about this vendor. This is for internal use only and will not print on any accounts payable document or form.
- Inactive: Only select this checkbox if the vendor should no longer be used on future transactions.
- Secure Vendor: If this checkbox is selected, only users that have been granted access to Secure Vendors will be able to work with this particular vendor.
Custom Fields Form
The Vendor Custom Fields are user defined and are used for tracking additional information about your vendors. If your company is using any of the Vendor Custom Fields, you can create reports based on this information using the AP Query Builder.
Access to this data entry form is only allowed if you have permissions granted within User Group Security. The data entry fields must first be assigned in SedonaSetup/Custom Fields-Vendor to be available for use. The information on this form is for internal company use and reporting purposes.

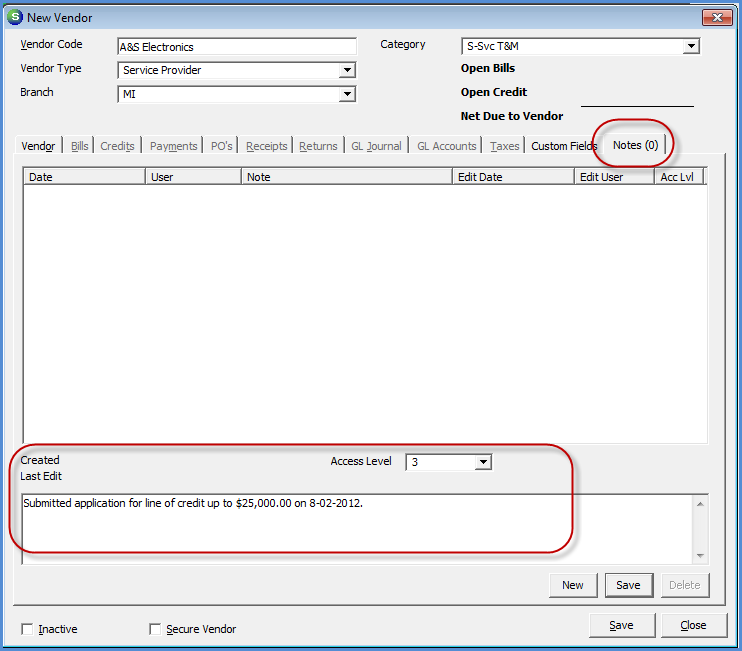
Notes Form
Vendor Notes are a place to store information pertinent to a specific vendor. Each Note entered can be up to 1,024 characters in length and is assigned a security Access Level. These Access Levels work in conjunction with the User Group Security Access Levels.
Users who are assigned to a User Group where the Access Level is set to 1 can only see Vendor Notes saved with an Access Level 1.
Users who are assigned to a User Group where the Access Level is set to 2 can only see Vendor Notes saved with an Access Level 1 or 2.
Users who are assigned to a User Group where the Access Level is set to 3 can see all saved Vendor Notes.