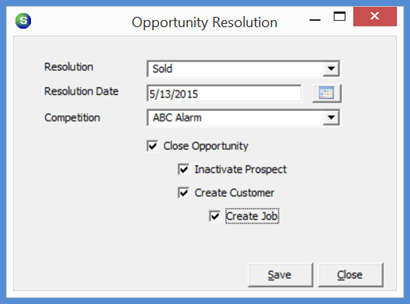
Jobs are created for Prospects by "resolving" an Opportunity for the Prospect.
If the prospect is an existing customer, do not use this job creation method. In the SedonaOffice Sales Management module, resolve the opportunity, inactivate the prospect/opportunity, and then use the manual job creation method to create the job.
Initial Job Setup steps in this section include these:
- Customer Billing Information Setup
- Site Setup
- Job Work Order Setup
- Job System Setup
- Install Charges Setup
- Recurring Charges
- Materials List
- Job Approvals
- Job Tasks
- Job Costing Estimate
- Commissions
- Custom Fields
Follow the steps listed below.
- Navigate to the Sales Management module/Prospects and open the prospect record to be converted into a new customer and job.
- Click the Opportunities button on the Prospect toolbar.
- In the upper tier of the Opportunities list, click once on the Opportunity that was sold then click the Resolve button located at the lower left of the form.

- The Opportunity Resolution form opens.
- Select Resolution Code from the drop-down list.
- Enter the Resolution Date (the date the sale was closed).
- Select the Competition from the drop-down list (optional).
- Select all four checkboxes; Close Opportunity, Inactivate Prospect, Create Customer, Create Job.
Once all information is filled in, click the Save button located at the lower right of the form.
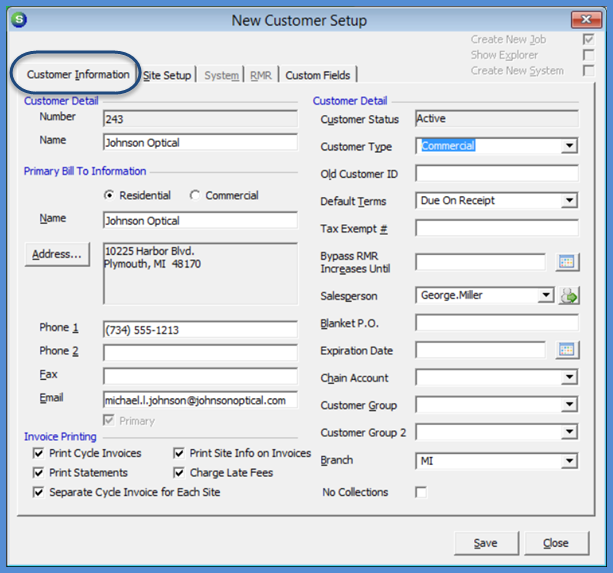
Customer Billing Information Setup
The New Customer Setup form opens on the Customer Information data entry form. The name and address information automatically filled into this form was pulled from the information on the Prospect form. This is the customer Billing name and address information; if this information is not the correct billing information you may modify any of the information. Fill out this form according to your company policy and procedures. When finished, click the Site Setup tab.
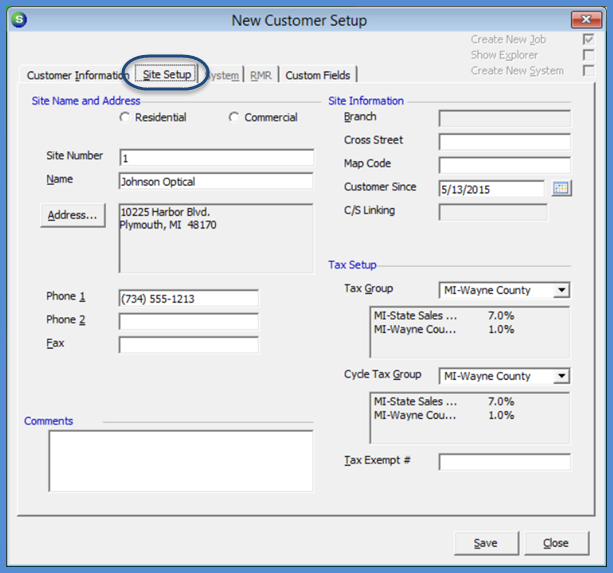
Site Setup
The Site Setup form opens. The name and address information automatically filled into this form was pulled from the information on the Prospect Opportunity form. If this information is not the correct site information you can change any of the information. Fill out this form according to your company policy and procedures.
If the Custom Fields tab(farthest tab to the right of Site Setup) is not dimmed out, this indicates your company is using some or all of the data entry fields on this form. When finished with the Site Setup, click on the Custom Fields tab and fill out this form according to your company policy and procedures.
When finished, click the Save button. There is a message confirming you want to save this new customer, click the Yes button to proceed.
Job Work Order Setup
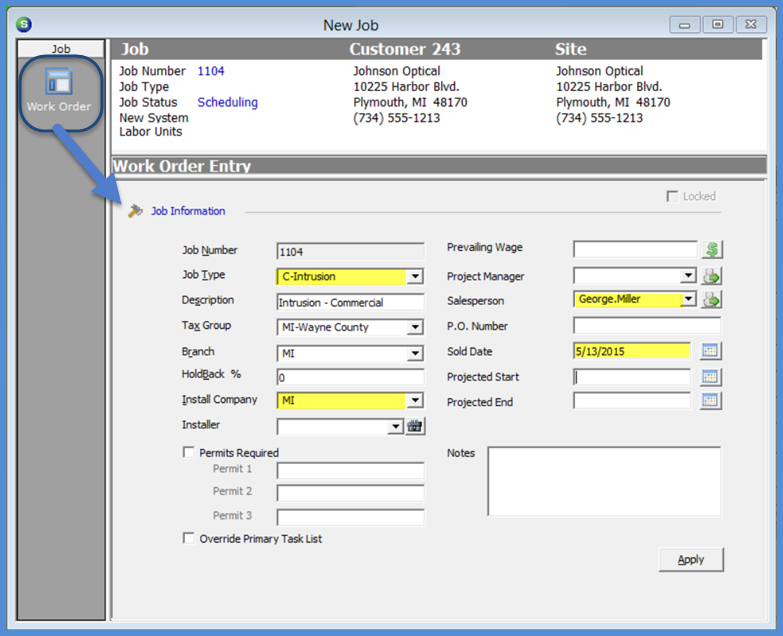
- The Work Order Entry form opens. This is the first data entry form for the new job. Most of the information on this form automatically fills in from the customer and site information. Fill out this form according to your company policy and procedures.
Four fields on this form are required to be able to save and advance to the second Job setup form: Job Type, Install Company, Salesperson and Sold Date.
When finished filling out this form, click the Apply button located at the lower right to save and advance to the Job System form.
Job System Setup
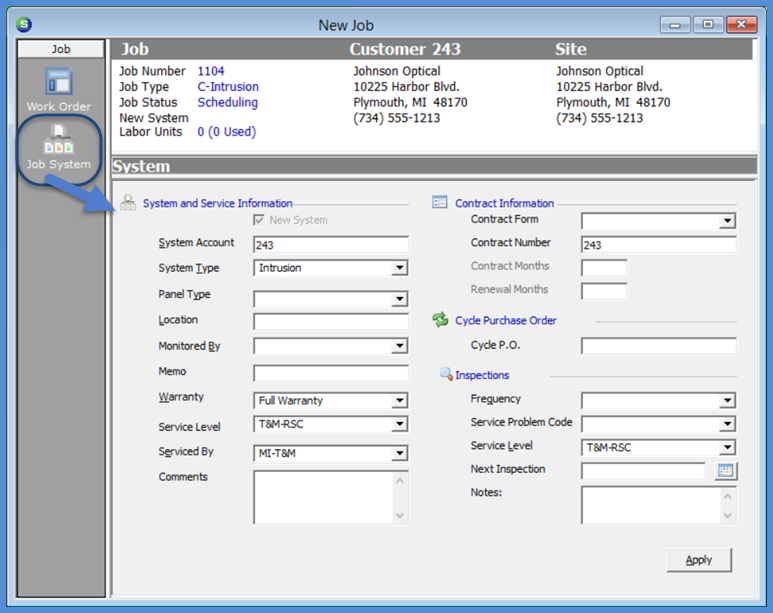
- The Job System form opens. If your company may need to create a Service Ticket for the system being installed while the job is in progress, it would not be possible until the job is closed. Since Service Tickets are linked to a system record, to be able to create a Service Ticket for this system you would need to setup the system information on the Customer Explorer record first; this method is highly recommended.
At this point, click the Apply button on the System form. Open the Customer Explorer record for the new customer, setup the system information and return to the Job System form and import that information into the Job System form.
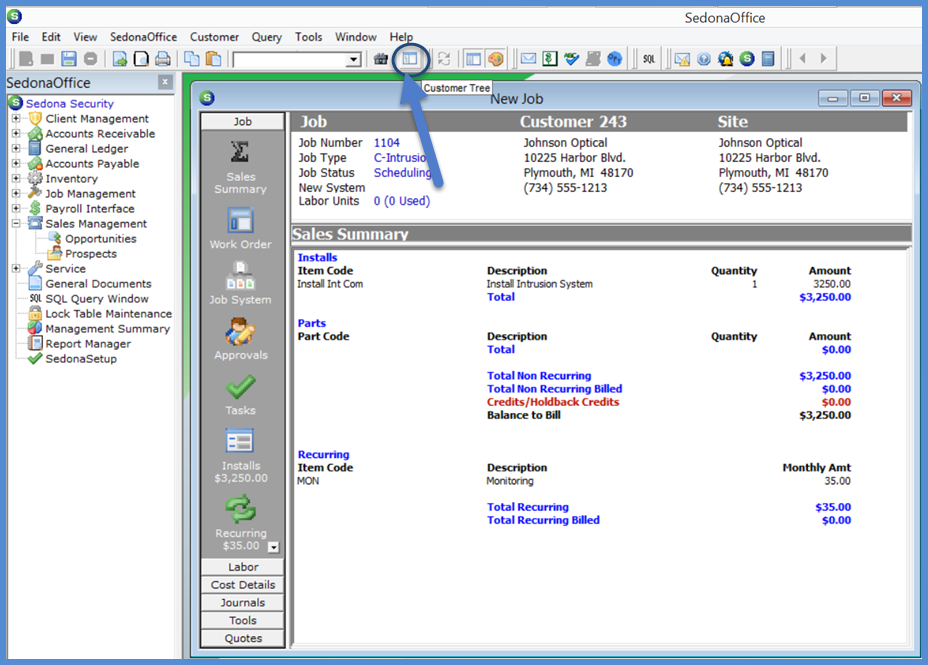
- From the Main Application Button Toolbar, click the Customer Tree button to open the Customer Explorer record.
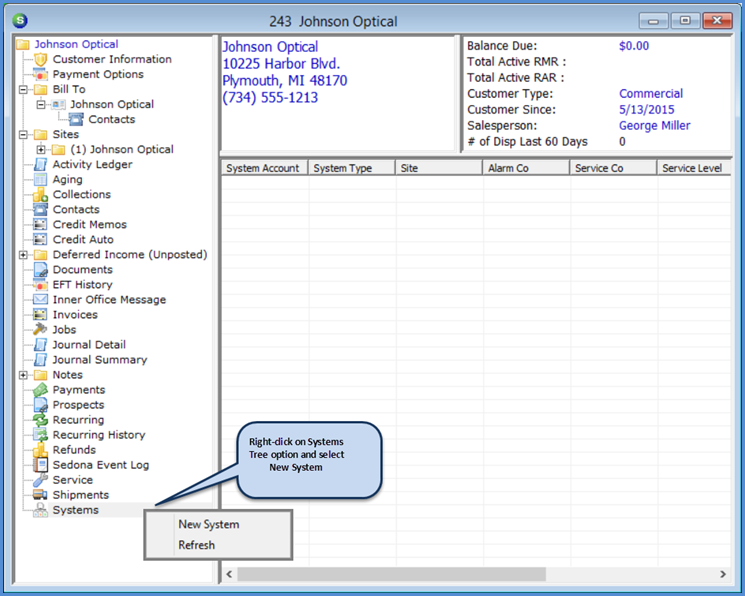
- Once the Customer Explorer record is displayed, highlight the Systems option from the Customer Tree; right-click and select the New System option.
- The System form opens. Fill out this form according to your company policy and procedures. When finished, click the Save button and close the Customer Explorer form.
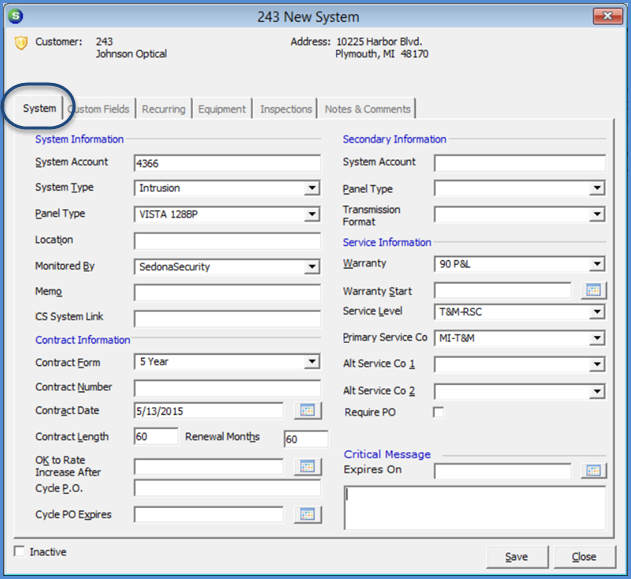
- Once the System record has been setup, return to the Job record. The next step loads the System information into the Job System form.
- Click the Job System button from the Job toolbar. Clear the New System checkbox at the top left of the System form; then click the lookup button to the right of the System Account field. The Select Customer System form opens. Double-click on the System record and click the Save button at the lower right of the form.
.png)
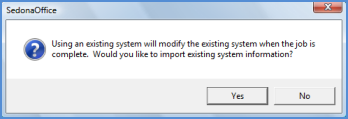
- A confirmation message opens; click the Yes button to proceed.
- The Job System form fills in with all the information setup from the Customer Explorer. Click the Apply button to save the information loaded into this form.
While the job is in process, any changes that need to be made to any of the fields of the System record must be done from the Job System form. When the job is closed, the Job System information overwrites the System information displayed in the Customer Explorer.
Install Charges Setup
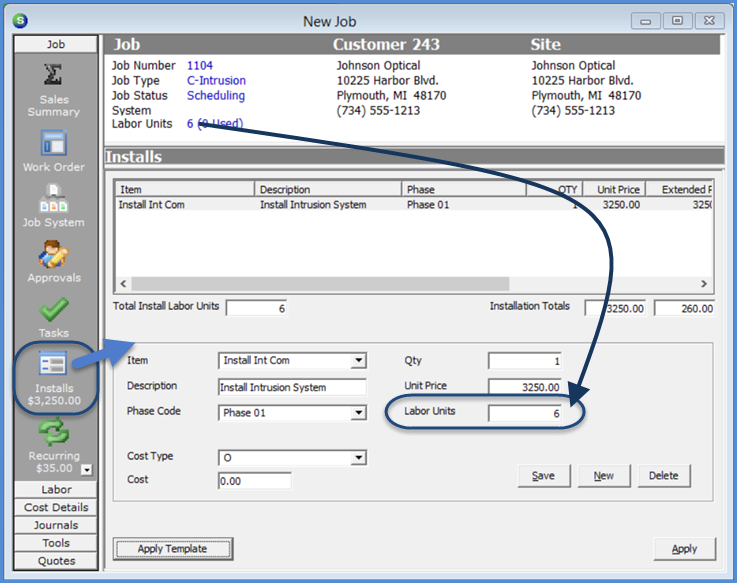
Use the Installs form to create a list of items to be invoiced to the customer. You can also enter the total estimated labor units for the Job on any of the Install Lines; this displays in the header area of the job record. As labor timesheets are entered for a Job, those labor units are displayed in the header area of the job record.
When a Job is created from a prospect, the Install lines automatically fill in from the non-recurring sales items selected on the Opportunity record. You can change these install lines if necessary. You can add Install Charge lines.
Once saved, Install Charges display in the Sales Summary form.
Once an invoice has been created for the job, install charge lines cannot be modified; any changes to install charges require creating a change order.
Recurring Charges
Use the Recurring form to create a list of Items to be invoiced to the customer for recurring services. The field Sub Item of is used if recurring lines are to be "rolled-up" on the customer invoice. In the example below, the Sub Item of has been set to Mon for both recurring lines. When the customer is invoiced, all recurring lines with the same Sub Item of code will be group together and the services description that will display on the invoice with be the description of the Sub Item of code.
The Cycle Start date may be entered if it is known when the recurring services will be activated. If a date is entered into this field, this will default into the Job Invoice as the activation date; this date may be overridden when creating the invoice. Typically this field is left blank and filled in later by a staff member who has confirmed that the system has been activated.
When a Job is created from a Prospect, the Recurring lines automatically fill in from the recurring Sales Items set up on the Opportunity record. These Recurring lines can be modified or changed if necessary. You can add more Recurring lines.
Once saved, Recurring Charges display in the Sales Summary form.
Once recurring services have been invoiced on a Job Invoice, the recurring line(s) will be activated and appear in the Customer Explorer record and will begin to bill with the next eligible cycle invoice batch.

Materials Setup
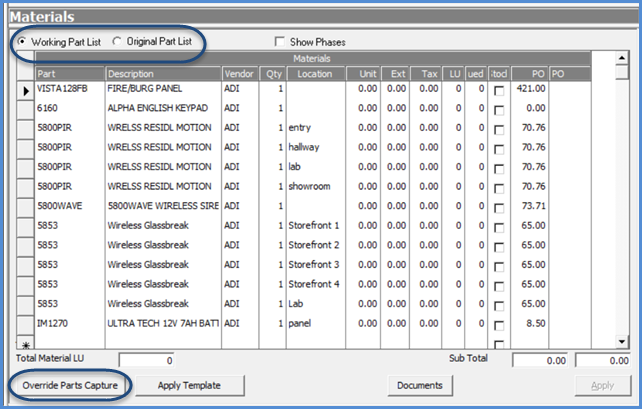
Use the Materials form is used to create a list of inventory parts to be used in the system installation. This form also displays the quantity of parts that have been issued to the job from a warehouse or from the receipt of a purchase order.
If the customer is being invoiced for the individual parts, when parts are selected, the unit sales price defaults into the part line. You can override the sales price if the customer is being charged a different amount. Any part lines with a unit price prints on the customer job invoice. If unit prices default into the part line but the customer is being invoiced a lump sum amount for all parts, you must zero out the part price, otherwise the part will be included on the customer job invoice.
There is a setting on each Job Type that automatically zeros out part prices; if this setting is in effect for the Job being processed, you will not be permitted to enter a sales price for parts; amounts for parts must be invoiced under the Install Charges.
Any amounts displayed in the LU (Labor Units) column are defaulted from the part setup. The application multiplies the quantity of the part times the labor units from the Part setup to arrive at a total estimated labor units for the job based on the materials list. If the total labor units calculated is less than the labor units estimated by the salesperson on the quote, you can enter the difference lacking on an Install charge line. You can also manually override the defaulted labor units on part lines if necessary.
If your company is tracking the location of where devices are installed at the site, you can type up to 50 characters in the Location field of the part lines. For example, if the job uses four motion detectors, enter four lines of the same part number and enter the location for each device.
Once the Materials list has been saved, the Capture Original Parts button is displayed at the lower left of the list. Clicking this button and then the Apply button, saves the original parts lists and creates a new "Working Parts List". If any changes need to be made to the parts list after the capture, this is done from the working parts list. You can toggle back and forth between the original parts list and the working parts list to see what changes have been made as the job progresses. User Permission is required to use the Capture Original Parts button.
After capturing the original parts list, if it is discovered the capture was performed before the parts list was completed, someone with the appropriate permission needs to click the Override Parts Capture button. Clicking the Override Parts Capture button creates a new Original and Working parts list.
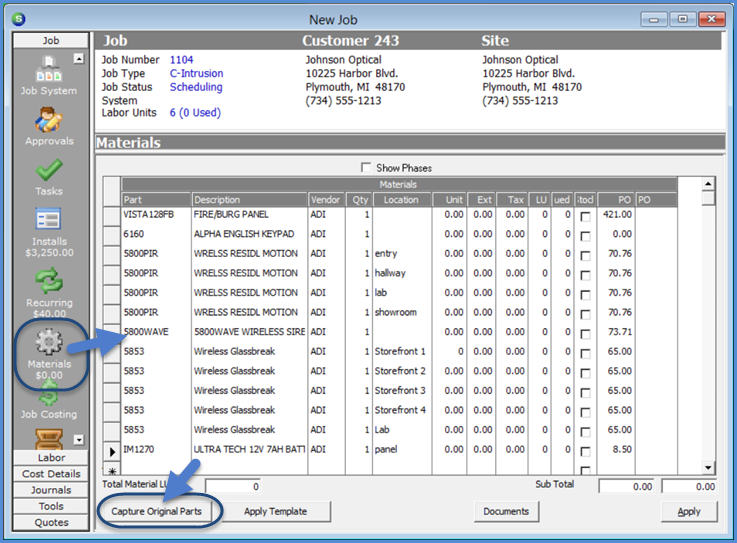
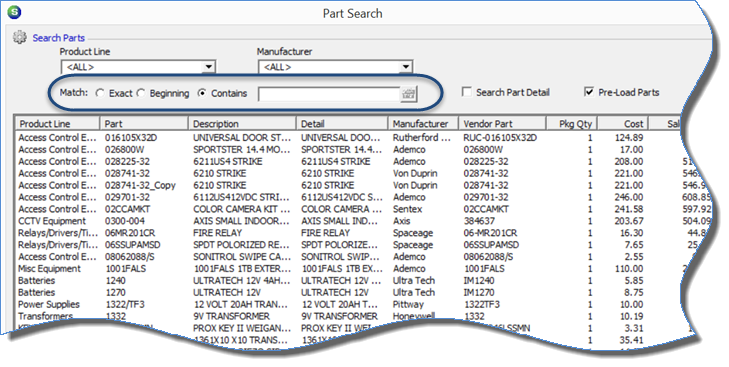
To add an inventory part to the Materials list, in the Part column, you can type in the exact part number if known and enter the quantity. If you do not know the exact part number, click the part lookup button  in the Part column to the right of the field. The Parts Search form opens. Locate the desired part and click the Select button located at the lower right of the Parts Search form. The selected part fills into the Materials list. Continue adding parts until all required parts have been added. When finished, click the Apply button located at the lower right of the Materials form.
Once saved, all parts selected display in the Sales Summary form.

Job Approvals
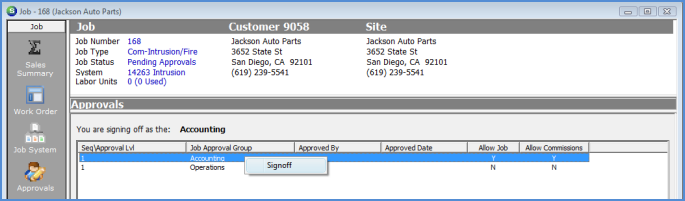
If your company is using Job Approvals and the Job Type requires approvals, the approval line flagged to allow job processing must be signed off to be able to release the job for scheduling and ordering parts. To approve a line, someone with the appropriate permissions will highlight the approval line, right-click and select the Signoff option.
Job Tasks
The list of Job Tasks is automatically loaded from the default Task List associated with the Job Type that was selected on the Work Order form. The Task list represents major milestones needed to complete the job. As each Task is completed, the responsible staff member will approve the Task which will advance the Job Status to the Status assigned to the next task in the list.
The Job Status indicates where the job is in the process of being completed. The job status is a filter on the job queue. For example, if the status of a job is currently at order parts, if someone in your company responsible for purchasing materials filters the job queue on this status, a list of just the jobs at this status are displayed.
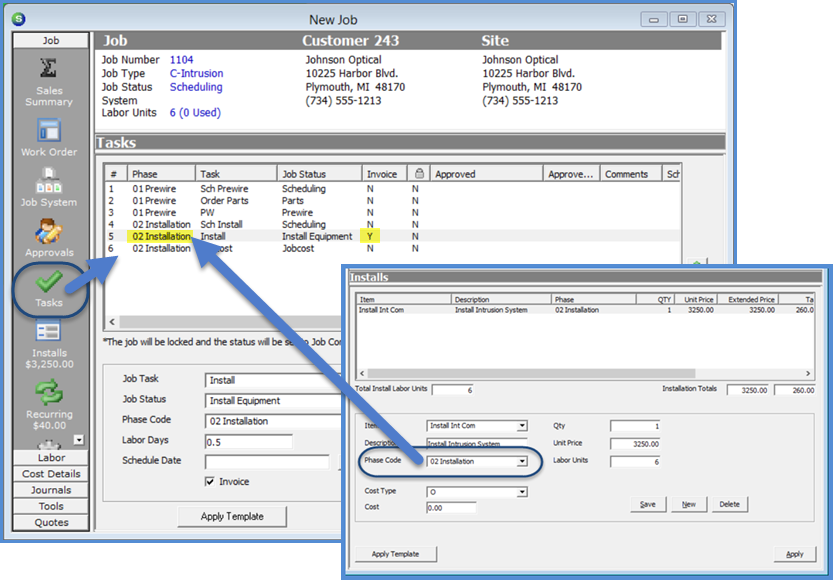
On each Job Task line, two fields are available for selection: Invoice and Sequence Locks Job. If you select the Invoice option, once this task has been approved job, the job appears in the job invoicing queue*. If you are performing progress billings on the job, you can select the Invoice option on multiple job task lines.
*If a Task line is flagged for invoicing and you are invoicing for Install Charge Line(s) or Parts (or both), the Phase Code on the Invoicing Task Line must have a corresponding Install Charge Line and Parts with the same Phase Code to be able to invoice the Job.
If you select the Sequence Locks Job option, once this task has been approved on the job, the job is put in "Lock" mode and a change order must be created to add, remove, or reduce part quantities, install charges, recurring charges, or commissions for the job.
A comments field is available for each Task line. You can type in and save pertinent information for a task if you have permissions to edit tasks. If a comment is entered on a task line that is flagged as an invoicing task, the comment entered will be transferred into the Invoice Memo field when the Job is invoiced.
If additional Tasks are needed, someone with the appropriate permissions add any number of task lines.
If needed, unapproved tasks may be moved up or down in the sequence of tasks to be performed. Highlighting a Task line then clicking the green up or down arrows to the right of the form moves the highlighted task.
Job Costing Estimate
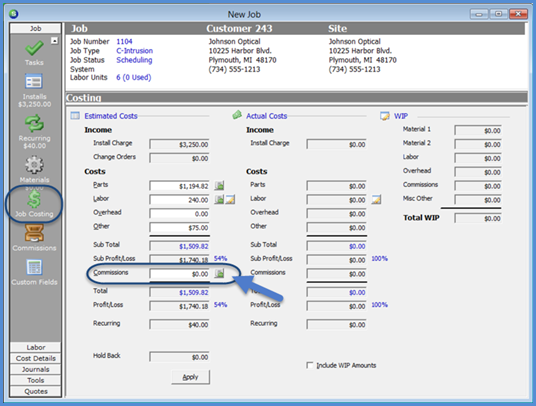
Use the Job Costing form to enter the estimated costs expected for the Job. These estimated amounts are used to compare to the actual costs as they are posted to the job and when reviewing the Job at completion to view the actual profitability of the Job.
The Job Costing form is divided into three columns; Estimated Costs, Actual Costs and WIP (Work in Process). Part of the initial job data entry is to enter the estimated costs for the job. As actual costs are incurred and posted to the job, these amounts are displayed in the WIP column if your company is using Work in Process accounts or in the Actual Costs column if not using WIP.
Anyone with access to the Job Costing form can view the job costs any time while the job is in progress to see how the job is performing as compared to the estimated costs.
The estimated costs are divided into five elements: Parts, Labor, Overhead, Other, and Commissions. Auto calculate buttons are available for the Parts, Labor, and Commission fields.
Parts
When you click the Calculate Cost Estimate button to the right of the Parts field, the application multiplies the part quantity times the standard cost of the part (if using standard costing) or the current average cost of the part (if using average costing) (from the company default warehouse) to arrive at estimated parts cost for the job.
Labor
There are two Calculate Cost Estimate buttons to the right of the Labor field. When you click the .png) button, the application multiplies the total labor units entered on Install Charge Lines and any labor units from the Materials list times the Estimated Labor Unit Cost factor on the Job Type setup to arrive at a total estimated labor dollars for the job.
button, the application multiplies the total labor units entered on Install Charge Lines and any labor units from the Materials list times the Estimated Labor Unit Cost factor on the Job Type setup to arrive at a total estimated labor dollars for the job.
Clicking the .png) button opens the Job Labor Tasks form. This form is used to breakdown the estimated labor costs into separate labor task lines. If this form is setup, your company can compare the estimated costs by labor type to the actual costs entered on Labor Timesheets. This form is optional.
button opens the Job Labor Tasks form. This form is used to breakdown the estimated labor costs into separate labor task lines. If this form is setup, your company can compare the estimated costs by labor type to the actual costs entered on Labor Timesheets. This form is optional.
.png)
Commissions
When clicking the Calculate button to the right of the Commissions field, the application automatically calculates the estimated commissions based on the commission setup for the job type and the salesperson selected on the Job Work Order form. Using the Calculate button does not record any financial transaction for the job regardless of whether your company is expensing commissions immediately or using commission work in process accounts. To record the commission transactions, use the Commission form (Commissions button on the Job Toolbar).
Commissions can be manually manipulated by using the Commissions form (Commissions button on the Job Toolbar); any amounts entered on the Commissions form automatically update the Estimated Commission amount field of the Job Costing form.
Overhead
If your company is automatically applying overhead, if you click the auto calc button for the Labor field, the Overhead estimate automatically fills in based upon your company setups in either the Job Type, Install Company, or JM Setup Processing.
Other
Use the Other field to enter any miscellaneous job expenses such as permits/fees, equipment rentals, subcontract labor, etc.
If desired, you can manually type in estimates or use the auto calc buttons in any of the estimated cost fields.
Commissions
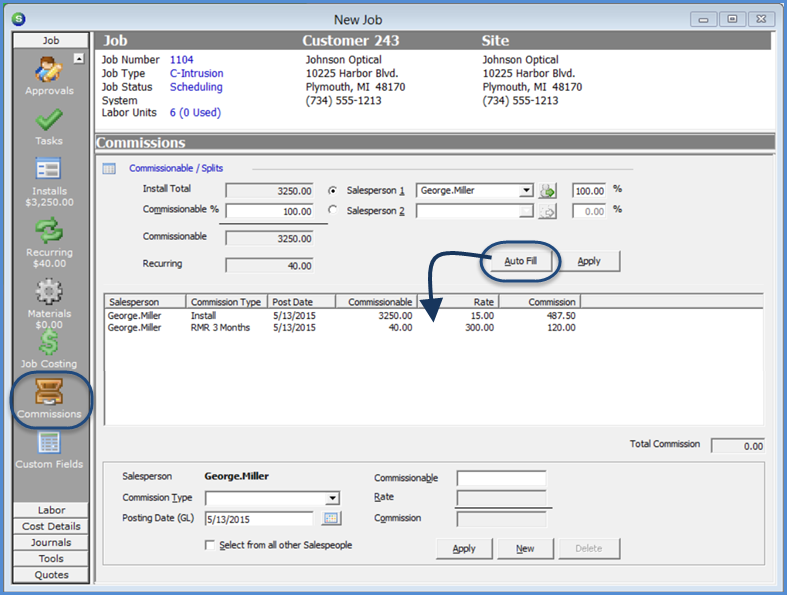
Use the Commissions form to list the commissions to be paid to the salesperson listed on the Work Order form and any other employee override commissions for a job. You have the option of manually entering commission line items or auto-filling the form based on the setup information for the job type and the employee commission setup for the salesperson assigned to the job or a combination of the two methods.
Follow the link for detailed information on the various methods available for entering Commissions.
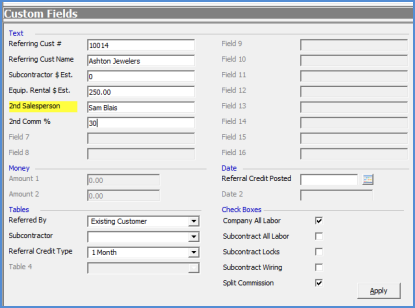
Custom Fields
The Job Custom Fields form is an optional part of the job record. This form is used to enter and track additional information pertinent to the job. If any of the fields on this form are highlighted in yellow, this is a required field. Fill in this form according to your company policies and procedures.